Showing posts with label barbie. Show all posts

Tuesday, December 16, 2014

Ugly Christmas Sweaters!

A friend of mine is selling some awfully cute
Ugly Christmas Sweaters.

There are girl and guy styles,
and will fit Fashion Royalty, Barbie
and other like-sized dolls :)

All of the ones pictured below are for sale,
$20 each!

Inquire here, or at

Girl Sweaters Available (including the one above!)
1. Lovely Reindeer
2. Santa Kitty
3. Screamin' Snowman
4. O' Christmas Tree
5. Regift

________________________________________


Guy Sweaters Available (including the one above!)
1. Naughty Reindeer
2. Krampus
3. Ugly Sweater
4. Light It Up
5. Bday Boy

Monday, June 30, 2014

Mid-Month Tutorial #6: agusyornet's Tiny Hangers!

Ok, so I *barely* squeaked this one in...
BUT IT'S STILL JUNE!
Me: Uhm... you're not Christie...
"Christie": Who's to say? You never did name me. *glare*
Me: *gulp*

Let's start with the facts!
I followed the tutorial by agusyornet,

I have to say, I love folks who can make clear, precise, easy to follow tutorials in 4 steps!
I have to admit, I modified mine just a little though... but let's get crafting and you'll see!

Supplies:

1. Paperclips
2. Needle Nose Pliers
3. Wire Cutters

 
Here's a little tip from me...
buy a pair of Needle Nose Pliers that have built in wire cutters!
 
 
••••••••••••••••••••••••••••••••••••••••••••••••••••••
Let's begin!
Step 1:
Pull the inner loop and the longer stem piece upwards.
 

Looking at the picture below will give you a good idea what I am talking about!
Make sure you pay attention to where the arrow is pointing in the image below.
You want that angle to feel "hangerish" to you.

Step 2:
Grab the loop end that you pulled up and bend it upwards.
You will leave the loop shape alone, that becomes your hanger hook.
I try to make it so that the hanger hook will end up centered when the hanger is finished.
 
 
Step 3:
In agusyornet's tutorial, she doesn't wrap the wire around the hanger hook, which is fine and will work great... I just like having a little more stability than that when it comes to hangers for doll clothes.
I pull the  longer stem past the hanger hook.


Step 4:
I then take and fold the longer stem over the base of the hanger hook...
it gives you one very stable little hanger!

 
Conclusion:
I LOVE this tutorial... there is something so satisfying about coloring these pencils and seeing them come to life.

This is such an easy and painless process for making tiny hangers!
Plus, they're ... uh... "Christie" tested and approved!


They really will work to hang up your dolly clothes!


The cost was minimal (my pliers cost me $3.99, the paperclips I've had around forever)
and so was the time investment.
I highly recommend you try this tutorial out!

Wednesday, April 16, 2014

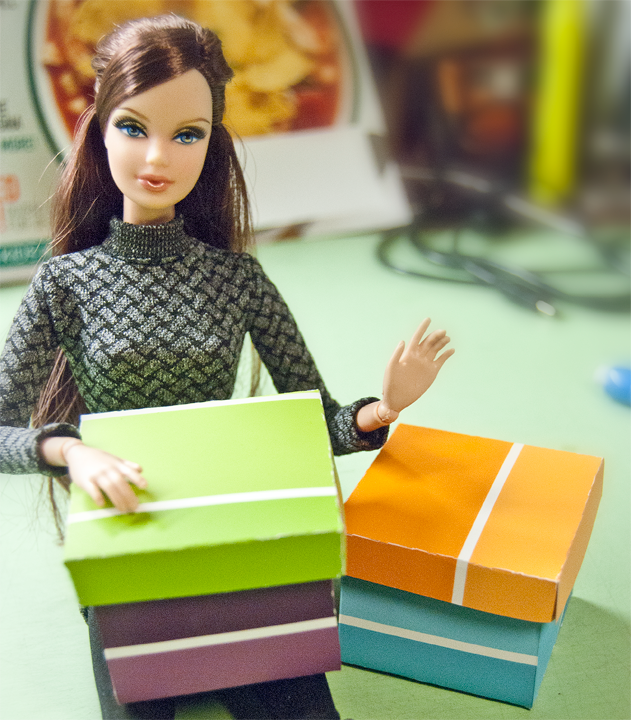
Mid-Month Tutorial #4: Flower _'s Paint Chip Box Tutorial

Christie: Hi everyone! I'm back with a new tutorial for you!


This one is pretty easy!


Supplies:

1. Scissors
2. exacto knife
3. Behr Paint Swatches
4. paper glue (I used Aleene's Tacky Glue)
5. ruler
6. Pencil

••••••••••••••••••••••••••••••••••••••••••••••••••••••
Let's begin!

Step 1:
Choose your Behr Paint Swatches in the colors you want the box to be.
You will need 2 swatches to make a box, one for the box, and one for the box lid.
You can pick these swatches up for free at your local hardware or paint store.

The swatches measure 5X6 inches.

For your box bottom, you will need to cut out a 5X5 inch square.

For your box top, you will need to cut out a 3X3 inch square.

Step 2:
When measuring your box bottom, it's wise to make sure you're not cutting on the curved edge.


Step 3:
Once you have your 5X5 inch box measured out, cut it out with scissors.
(You can also use a ruler and exacto knife, but it's not necessary to be that precise)
Christie: Human sized scissors suck...

Step 4:
Now it's time to cut out the 3X3 box top.
I like to make two lines (like you see below) and then measure from there...

Step 5:
Here is where the instructions are a little vague...
 
The next step is to draw the lines for where you'll cut the flaps and make the folds...
and the tutorial measurements say:
 
For the 5X5 box bottom:
Measure in "a tad over 1.5 inches"
... well...
ok?
So, here is what I chose for my "a tad" measurement.
You can see the pencil mark falls between the 5 (which marks 1.5 inches) and the 6.
My "a tad" is very small.

In the end, your Box Bottom swatch should look like this:
(divided into 9 boxes)

For the 3X3 inch top:
Measure in "a tad under half an inch"
On this ruler, the 5 marks 'half an inch', and I made my pencil mark between the 4 and the 5.

In the end your Box Top swatch should look like this:
(divided into 9 sections)
Christie: Yup, looks good.

Step 6:
Next we're going to cut out the tabs!

Christie: I recommend using the Exacto knife for this next bit!

The black dots mark where I cut.
I don't measure, I just sort of roughly cut out some bits...
ONLY cut where the black dots are,
the other pencil lines are for folding along!

Also, pay attention to the fact that the notches you will be cutting out go outward,
and do not cut into the middle box on the top and bottom rows.

In the end you will cut out tabs like this:

Do the same on the box lid (but obviously, the notches will be much smaller!)
Again... I just eye-balled it:


Step 7:
Now I use the ruler to help me fold along the pencil lines!
Fold along all the pencil lines!


Step 8:
Now it's time for GLUE!


The tiny tabs that you created by cutting out the notches on the box top will be glued to the inside, so fold them inward...

And then glue them!
 

On the box bottom, the tabs aren't quite as tiny, but you still glue them inward,
they will just overlap.
 

To have a nice box, it is very important to make sure the top edges all line up evenly!
 

This picture illustrates where I put the glue!

FINISHED!!
You have some cute, multicolored little storage boxes!
Christie: These would look great in any girl's house!

Conclusion:
This was a pretty great, simple, cheap tutorial!
I suggest everyone try it out!

Monday, March 17, 2014

Mid-Month Tutorial #3: blackfrangipani's chest of drawers


Christie: Hi everyone! Time for another Mid-Month Tutorial!


This one is a bit more complicated than the last two XD
The list of supplies on blackfrangipani's page is much longer than mine...
I opted for her simpler instructions when it came to things like attaching the drawer handles...
so I will be including my list of supplies. To see blackfrangipani's list,
please click the links above. :)

Supplies:
1. Scissors
2. exacto knife
3. scrapbooking paper
4. paper glue (I used Elmers)
5. strong hold glue (I used gorilla glue)
6. beads
7. thin balsa wood
8. foam core
9. ink pad
10. sharpie marker
11. rubber band
12. matchboxes
13. pencil
Optional:
14. paintbrush
15. paint that matches inkpad
••••••••••••••••••••••••••••••••••••••••••••••••••••••

Let's begin!

Step 1:
Remove the matches from the match boxes!
In blackfrangipani's tutorial, she used 10 matchboxes...
but I figured for my first try, I would make something more like a jewelry box,
and only use three.
Step 2:
Using Elmer's glue, I covered one side of the matchbox.
Step 3:
Repeat this step until all of your boxes are glued together.
(If you had boxes being lined up side by side, you would glue their sides together as well)
Step 4:
When you have all your shelves glued together,
wrap a rubber band around them (make sure they're all lined up straight!)
and let the glue dry completely.
Step 5:
While we wait for the body of the chest of drawers to dry,
we can start working on the drawers.
To begin, you will need the stamp pad and a marker of matching color.
Step 6:
Coat the front, back, sides and bottom of the drawers in your ink color of choice,
then allow to dry.
Helpful Hints:

1. Ink is messy, put a piece of paper under your work station.
2. Dabbing ink took FOREVER! Sliding the drawers in a back and forth motion over the ink pad was much quicker.
Step 7:
Sit back and eat some cookies...
now is when you have to wait for everything to dry.
Step 8:
Now you'll need a pencil, the foam core and an exacto knife.
I also recommend having a spare matchbox around, for measuring.
On the foam core, trace the bottom of your chest of drawers.
blackfrangipani says she likes to add a layer of foam core to the bottom of the chest of drawers 
because it gives it more weight, and makes it feel more realistic. I am inclined to agree.
Use the exacto to cut the foam core out.
If you have shaky or unsteady hands, I recommend using a ruler when you cut,
but I just did it freehand.
Step 9:
Glue the foam core to the bottom of chest of drawers.
Before I attach the foam core, I use the marker (the one that matches the ink color) to color in the edges of the foam core.
Wrap a rubberband around the chest of drawers and let dry.
(You might be saying, "DUDE! You *just* said you colored the foam core... and now I see it, it's totally white!... this is the back side you're looking at... when the chest of drawers is comepleted, the back and sides will be covered, so no need to color them in :) )
When this is dry, though, it is a good time to color in all the edges of the cardboard with the marker that matches your inkpad.
Step 10:
Trace the sides and back of the chest of drawers (including the foam core) onto the wood
Cut the wood using your exacto knife.
(again, if you have an unsteady hand, use a ruler to help guide your cut!)

Step 11:
Glue the wood paneling to the sides.
I did the sides first, and then the back later, after the sides had dried.
Apply weight to help keep the wood panels flat as they dry.
Step 12:
Now let's work on the shelves some more!
Trace the bottom of one of the drawers (I used the extra matchbox for this)
onto the back of the scrapbooking paper that you want to line the drawers.
Cut the rectangles you've traced out, and press them into the bottoms of the drawers.
There is no need to glue them. :)
Step 13:
Once the body of the chest of drawers is all put together, and before applying the scrapbooking paper,
color in all the edges of your piece with the marker that matches your inkpad.
Now... mine didn't line up as nicely as blackfrangipani's did... so I also went in with some paint and a paintbrush and filled it in a bit.
Step 14:
I apologize... but evidently I got over excited and forgot to take pics of the next few scrapbook paper cutout steps. I glued all of these pieces on with Elmer's Glue.
Anyways, trace the sides and back of the chest of drawers onto the back of the scrapbooking paper you want to cover it with, then cut those out. 
Next, trace the top of the chest of drawers, but make it a little bit longer than the top, so you can overlap it onto the back. (You can kind of see the line where the paper from the top of the chest of drawers is covered by the paper on the back.
In gluing application, put the top piece of paper on first, then cover it with the back piece.
Trace the fronts of the drawers onto the back of the scrapbooking paper you want on your drawer fronts, then cut those out and apply with Elmer's glue.
Step 15:
Next, we will break out the heavy duty glue.
I used Gorilla Glue... which was scary... that stuff is serious gluing business...
but dang does it work!
Anyways, I opted for blackfrangipani's simpler drawer pulls.
You can go check out her post for directions on more elaborate ones.
Put a little dab of glue where you want the pulls (and legs, if you opt to add legs to your chest of drawers) to go, then attach and let dry (for as long as the glue bottle recommends)
FINISHED!!
The end!
You have a little chest of drawers!
You can see where I needed to take more care in not scuffing up my paper edges. *sigh*
Christie: I need more jewelry.

Christie: This really is a great size for us playscale gals.

Problems:
The only *real* problem I had with this tutorial was blackfrangipani's suggestion of using ink.
I've no idea if my ink was too cheap, or what... but it DID NOT DRY... and continued to get all over my fingers, and thus all over my paper, and I was constantly afraid of getting it inadvertently all over my dolls as well.
I would not use ink again.
Or, at least, not THAT ink.
 •••••••••••••••••••••••••••••••••••••••••••••••••••••••••

Conclusion:
 I really love this tutorial!
Overall, once you have the basic stuff you need to make it,
it's a pretty cheap tutorial with pretty awesome results!!!
Thank you, blackfrangipani!
I think for a first try, this turned out pretty cute, if not a bit... er... wonky.
As my father-in-law would say, "Not a right angle in the thing!"
... but admittedly, I wasn't *as* careful as I could have been when letting things dry and set,
so with practice, I think I could do better... and I would not blame the tutorial for the wonkiness of my chest of drawers.